AI development using UE5FSM
Introduction
In this article we’ll show an example of how to make an AI for a multiplayer horror game using my own tool called UE5FSM, which is a powerful way of creating stateful logic such as AI. Its quick overview was already done in another article.
To illustrate the plugin functionality we need some game to show it on. We’ll be making a simple multiplayer horror game, but we will not be covering too much of non-plugin related UE features, otherwise the article would be 10 times longer that it is. Instead, we’ll be showing on how to start using the plugin, and what you have to do to get convenient places you can put your code in.
Don’t worry when we say multiplayer horror game: we won’t be covering any networking, it’s only required to increase the complexity of the AI since there’ll be multiple players capable of interacting with the AI in different states giving us more opportunities to illustrate the functionality.
Game Design
We’ll be developing a multiplayer horror game. Players are presented with small levels containing a boss that tries to hunt them down while they are trying to complete some tasks. There are 5 tasks; completing each will make the AI stronger for the players, as it’ll become more aggressive and fast, forcing players to act quickly.
When the boss gets to a player, it’ll knock them after a series of events. Players, on the other hand, have flashlights to fight the boss back: after it for long enough it’ll be stunned, making the AI lose the grip - become passive once again and release the player that had to be knocked if any.
AI Design
The AI has different phases, some of them might last for minutes, while others mere seconds. Let’s list all of them to have a clear idea of what exactly we’re going to implement, but firstly let’s list the features that are going to be present in almost every state: stuns.
Stuns
Stun state is a state where the AI becomes immortal and inactive. Depending on the stun type the AI will transit into different states. They are meant to last for a few seconds to play an animation.
Soft Stun
Soft stun is applied anytime the AI gets flashlight by players for long enough. It’s meant to notify players about avoided threat by playing a dizzy animation. After this type of stun the AI is going to transit to passive state if not told otherwise. It’s not applicable when the boss is immortal, as flashlights do not affect it.
Rage Stun
Rage stun is applied anytime the AI transits from the passive state to the aggressive state. It’s meant to notify players about incoming threat by making the AI play an animation and loudly scream, so that any player can hear that in any part of the map.
Hard Stun
Hard stun is applied anytime players progress the game by completing a task transmitting the AI to the passive state, giving players some breathing room. It’s meant to notify players about the AI being hurt, as the game is intended to make the boss angrier with progression, which will decrease the time it takes to the AI to switch to the aggressive state, increase its speed, give it new abilities, and anything you would like your game to have. In our case it’ll be pretty simple. The stun is applicable in ANY state regardless, meaning that players are safe to finish a task, as they won’t be immediately killed afterwards.
Patrolling
This state is considered the passive state, and it’s the state the AI starts its lifecycle at. As the name implies, the AI simply patrols an area looking for any intruders. When it sees one, it starts chasing them (Chasing Player state).
When this state starts, it setups a timer which duration will depend on the game progression, meaning that it’ll last less as the game progresses, upon which the boss will transit to the aggressive state.
During this state the boss is immortal, meaning that the players cannot flashlight it, hence Soft Stun is not applicable.
Seeking
This is the aggressive state. Upon entering it, the boss will enter the Rage Stun state which will pop itself once terminated. The AI will be seeking for players to kill as it’ll already know that there are intruders in the area. However, it won’t be always active once the AI spots a player, but only when enough time passes since the Patrolling state. When the boss sees a player, it switches to the Chasing Player state.
Chasing Player
During this state the AI runs after a player. The player can either escape or get caught. When the player escapes the boss switches to the previous state (This can be improved by adding some Investigating Area state, but we’ll keep that simple). On the other hand, when the AI gets to a player it grabs them. You might want to play some screamer or anything like that to scare the player, but all we’re going to do is to switch to Carrying Player state.
Carrying Player
Upon getting to a player, the boss is going to knock them. Before it happens, it brings them to a random point, perhaps some place that has the correct tools to do that; what exactly will be the place, it’s up to you. Upon reaching that, the player will be knocked, and the boss will switch to the passive state. What exactly players have to do with knocked player is also up to you.
If the boss will be stunned during this state it’ll release the player, making them able to run freely once again.
First Steps
Environment Setup
To start using UE5FSM we need to setup the environment. We’ll be using Third Person Template project based on C++ named DemoUE5FSM. After creating one, we would need to get the plugin itself from the repository and its dependencies - Laura’s UE5Coro. After downloading all the plugins, move their “Plugins” directory under the project’s root directory. After that enable them in DemoUE5FSM.uproject like this:
"Plugins": [
	{
		"Name": "UE5FSM",
		"Enabled": true
	},
	{
		"Name": "UE5Coro",
		"Enabled": true
	},
	{
		"Name": "UE5CoroAI",
		"Enabled": true
	}
]
and also in the DemoUE5FSM.Build.cs like that
PublicDependencyModuleNames.AddRange(new string[]
	{
		/* Other modules */
		"AIModule",
		"GameplayTags",
		"UE5Coro",
		"UE5CoroAI",
		"UE5FSM",
	}
);
that includes UE5Coro and UE5FSM along the gameplay tags that will be used in UE5FSM to identify labels and the AI module in order to use things like AI Controller.
Try to compile, and see whether it gives any error. If it doesn’t you’re good to go!
UE5FSM used in this article is v1.3.1-alpha. If you happen to read the article with newer version out there, some code might look different.
Code setup
All the illustrated code and more you can find under this Github repository.
Let’s begin with parenting all the useful classes of the plugin, so that we have some space to build our game-specific logic in.
Firstly, inherit the UE5FSM classes. We need to create a normal state, a global state, and the global state’s data. We’ll not only inherit them, but also cache some of the useful data we’ll be using down the road. It’s heavily encouraged to do so as it shorthands a lot of expressions saving you a lot of time in the future.
using namespace UE5Coro;

UCLASS(Abstract)
class DEMOUE5FSM_API UDemo_BossState
	: public UMachineState
{
	GENERATED_BODY()

protected:
	//~UMachineState Interface
	virtual void OnAddedToStack(EStateAction StateAction, TSubclassOf<UMachineState> OldState) override;
	virtual void OnRemovedFromStack(EStateAction StateAction, TSubclassOf<UMachineState> NewState) override;
	//~End of UMachineState Interface

protected:
	TWeakObjectPtr<ADemo_BossController> Controller = nullptr;
	TWeakObjectPtr<ADemo_BossCharacter> Character = nullptr;
	TWeakObjectPtr<class UDemo_GlobalBossStateData> GlobalStateData = nullptr;
};

UCLASS()
class DEMOUE5FSM_API UDemo_GlobalBossStateData
	: public UMachineStateData
{
	GENERATED_BODY()

public:
	bool bIsInvincible = false;
};

UCLASS()
class DEMOUE5FSM_API UDemo_BossState_Global
	: public UDemo_BossState
	, public IGlobalMachineStateInterface
{
	GENERATED_BODY()

public:
	// Empty for now
};
void UDemo_BossState::OnAddedToStack(EStateAction StateAction, TSubclassOf<UMachineState> OldState)
{
	Super::OnAddedToStack(StateAction, OldState);

	Controller = GetOwnerChecked<ADemo_BossController>();
	Character = Controller->GetPawn<ADemo_BossCharacter>();
	GlobalStateData = StateMachine->GetStateDataChecked<UDemo_GlobalBossStateData, UDemo_BossState_Global>();

	check(Character.IsValid());
}

void UDemo_BossState::OnRemovedFromStack(EStateAction StateAction, TSubclassOf<UMachineState> NewState)
{
	Controller.Reset();
	Character.Reset();
	GlobalStateData.Reset();

	Super::OnRemovedFromStack(StateAction, NewState);
}
Note that we’re using OnAddedToStack() and OnRemovedFromStack() methods to cache and clear the data respectively.
These are the entry and exit points for the machine state initialization wise. It means that if the state machine is
about to be relevant, it’s going to get the OnAddedToStack() event. On the other hand, OnRemovedFromStack() is
called just before the machine state becomes irrelevant.
Secondly, inherit the ACharacter named ADemo_BossCharacter and AAIController named ADemo_BossController.
Thirdly, add the finite state machine component (UFiniteStateMachine) to the controller, as it should control our AI.
The result should look like this:
UCLASS()
class DEMOUE5FSM_API ADemo_BossController
	: public AAIController
{
	GENERATED_BODY()

public:
	ADemo_BossController();

	UFiniteStateMachine* GetStateMachine() const;

protected:
	//~AAIController Interface
	virtual void OnPossess(APawn* InPawn) override;
	//~End of AAIController Interface

protected:
	UPROPERTY(VisibleDefaultsOnly, BlueprintReadOnly, Category="AI")
	TObjectPtr<UFiniteStateMachine> StateMachine = nullptr;

	TWeakObjectPtr<UDemo_BossState_Global> GlobalState = nullptr;
	TWeakObjectPtr<UDemo_GlobalBossStateData> GlobalStateData = nullptr;
};
ADemo_BossController::ADemo_BossController()
{
	StateMachine = CreateDefaultSubobject<UFiniteStateMachine>("FiniteStateMachine");
	StateMachine->bAutoActivate = false;
}

UFiniteStateMachine* ADemo_BossController::GetStateMachine() const
{
	return StateMachine;
}

void ADemo_BossController::OnPossess(APawn* InPawn)
{
	Super::OnPossess(InPawn);

	// Activate the machine only after possessing the pawn it'll be controlling
	StateMachine->Activate(true);

	// Cache this data so that we can easily interact with our FSM
	GlobalState = StateMachine->GetStateChecked<UDemo_BossState_Global>();
	GlobalStateData = StateMachine->GetStateDataChecked<UDemo_GlobalBossStateData, UDemo_BossState_Global>();
}
UCLASS()
class DEMOUE5FSM_API ADemo_BossCharacter
	: public ACharacter
{
	GENERATED_BODY()

public:
	ADemo_BossCharacter();

protected:
	//~ACharacter Interface
	virtual void PossessedBy(AController* NewController) override;
	//~End of ACharacter Interface

protected:
	TWeakObjectPtr<ADemo_BossController> BossController = nullptr;
	TWeakObjectPtr<UFiniteStateMachine> ControllerStateMachine = nullptr;
	TWeakObjectPtr<UDemo_BossState_Global> GlobalState = nullptr;
	TWeakObjectPtr<UDemo_GlobalBossStateData> GlobalStateData = nullptr;
};
ADemo_BossCharacter::ADemo_BossCharacter()
{
}

void ADemo_BossCharacter::PossessedBy(AController* NewController)
{
	Super::PossessedBy(NewController);

	// Wait a tick as it takes that to finish FSM initialization
	GetWorldTimerManager().SetTimerForNextTick([this]
	{
		// Sanity check
		if (IsValid(Controller))
		{
			// Cache this data so that we can easily interact our controller's FSM
			BossController = CastChecked<ADemo_BossController>(Controller);
			ControllerStateMachine = BossController->GetStateMachine();
			GlobalState = ControllerStateMachine->GetStateChecked<UDemo_BossState_Global>();
			GlobalStateData = ControllerStateMachine->GetStateDataChecked<UDemo_GlobalBossStateData, UDemo_BossState_Global>();
		}
	});
}
It’s a lot of boilerplate! However we still need to do some little things, as the character doesn’t know what AI controller it should be using, as well as global state doesn’t know its state data. The latter action is heavily encouraged to do in blueprints as we most likely are going to change some of its properties when working on gameplay features. Not re-parenting the state data would result into hard code, and you would need to re-compile the source anytime you change any property - that’s awful!
Let’s start by overriding the UDemo_GlobalBossStateData and the UDemo_BossState_Global. The two blueprints are
going to be called SD_Boss_Global and MS_Boss_Global accordingly. SD stands for State Data, and MS stands
for Machine State. Inside the MS_Boss_Global assign the state data class to the newly created one.
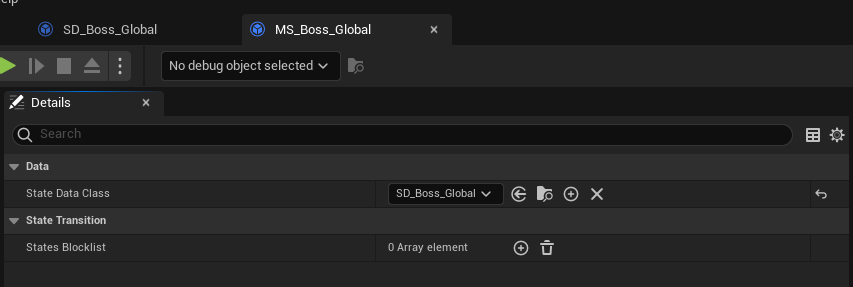
Now override the ADemo_BossController, and name it AIC_Boss. AIC stands for AI Controller. Now assign our newly
created global state to the state machine.
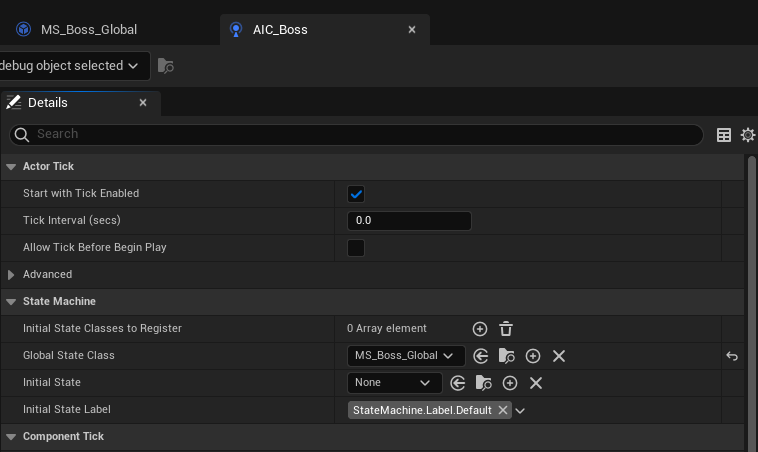
Finally override the ADemo_BossCharacter named CH_Boss. CH stands for Character. Don’t forget to assign the
AIC_Boss to its default AI controller.

Also assign the skeletal mesh, rotate and move it accordingly, and give it an animation blueprint. For demonstration purposes we’re going to use the template assets.
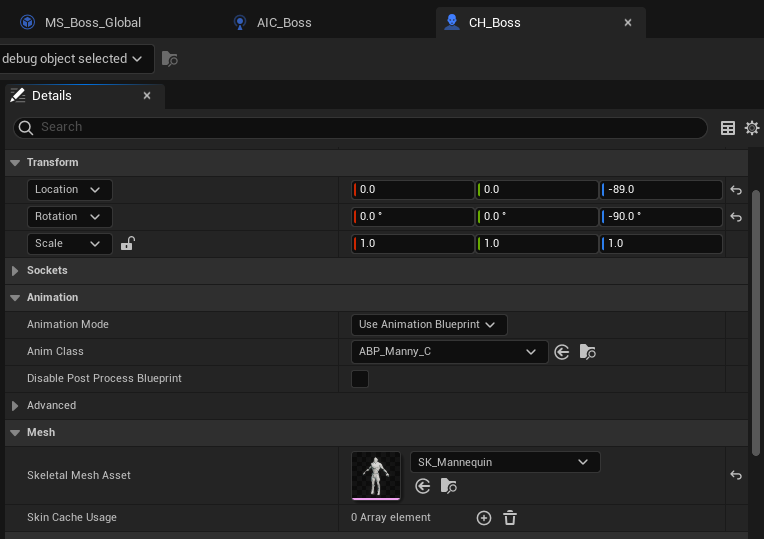
Finally, with all the setup out of the way we can finally start jump to the interesting part - the gameplay!
Implementation
Patrolling State
We’ll start creating our AI off the base states, increasing the complexity with each step. Since the AI lifecycle starts with patrolling state it’ll be the one we’ll be implemented first.
To create a new state we need to inherit an existing one. In our setup we’ve made the UDemo_BossState which is the
base machine state for our boss character. That’s how a simplified patrolling state would look like:
UCLASS()
class DEMOUE5FSM_API UDemo_BossState_Patrolling
	: public UDemo_BossState
{
	GENERATED_BODY()

protected:
	//~UDemo_BossState Interface
	virtual void OnActivated(EStateAction StateAction, TSubclassOf<UMachineState> OldState) override;
	virtual void OnDeactivated(EStateAction StateAction, TSubclassOf<UMachineState> NewState) override;
	//~End of UDemo_BossState Interface

	//~Labels
	virtual TCoroutine<> Label_Default() override;
	//~End of Labels

	void DelaySeekingState();
	AActor* GetMovePoint() const;

protected:
	UPROPERTY(EditDefaultsOnly, Category="Movement", meta=(ClampMin="0.0"))
	float MinWaitTimeUponMove = 1.f;

	UPROPERTY(EditDefaultsOnly, Category="Movement", meta=(ClampMin="0.0"))
	float MaxWaitTimeUponMove = 3.f;

	UPROPERTY(EditDefaultsOnly, Category="Seeking Transition", meta=(ClampMin="0.0"))
	float SeekingTransitionDelay = 10.f;

private:
	FTimerHandle SeekingTransitionTimer;
};
void UDemo_BossState_Patrolling::OnActivated(EStateAction StateAction, TSubclassOf<UMachineState> OldState)
{
	Super::OnActivated(StateAction, OldState);

	GlobalStateData->bIsInvincible = true;
	DelaySeekingState();
}

void UDemo_BossState_Patrolling::OnDeactivated(EStateAction StateAction, TSubclassOf<UMachineState> NewState)
{
	GlobalStateData->bIsInvincible = false;
	GetTimerManager().ClearTimer(SeekingTransitionTimer);

	Super::OnDeactivated(StateAction, NewState);
}

TCoroutine<> UDemo_BossState_Patrolling::Label_Default()
{
	while (true)
	{
		AActor* MovePoint = GetMovePoint();

		// Get to a patrol point
		RUN_LATENT_EXECUTION(AI::AIMoveTo, Controller.Get(), MovePoint, -1.f, EAIOptionFlag::Disable);

		// Stay idle for a while
		RUN_LATENT_EXECUTION(Latent::Seconds, FMath::FRandRange(MinWaitTimeUponMove, MaxWaitTimeUponMove));
	}
}

void UDemo_BossState_Patrolling::DelaySeekingState()
{
	GetTimerManager().SetTimer(SeekingTransitionTimer, [this]
	{
		StateMachine->PushState(UDemo_BossState_Seeking::StaticClass());
	}, SeekingTransitionDelay, false);
}

AActor* UDemo_BossState_Patrolling::GetMovePoint() const
{
	// The implementation is omitted due to some extra non-AI related complexity; you can find it in the repository
	return nullptr;
}
Let’s break this into multiple pieces.
Firstly, the AI has to move between different points. That’s done inside the Label_Default(). The label loops
infinitely, and it does two things: move to a point, and stay idle for some time. That’s pretty simple, but you
might add more behavior if you wish.
Secondly, boss has to enter Seeking state at some point. To do that, we set a timer anytime the state starts. The
state might start with Begin, Push, or Resume event, but in all three cases we’re interested in starting the timer,
hence we use the UMachineState::OnActivated() that unifies the three methods. We also need to clear the timer
anytime we leave the state so that we don’t accidentally start seeking while we’re in any other state, like stunned.
To do that we use the UMachineState::OnDeactivated() which is called anytime the End, Pop, or Pause event takes place.
Thirdly, we make the boss invincible by setting the bIsInvincible flag to either true or false depending on the context in the global state data we’ve cached in the “Code Setup” section. We’re not using the variable anywhere, but we’ll at some point.
Fourthly, the Seeking state is delayed anytime the state becomes active, and the timer is cleared when it becomes inactive. At the moment we didn’t implement the Seeking state, but that’s just for the future.
Someone could ask why we’re not delaying the Seeking state inside our label. The reason is that we have other latent code running in there, and only one single latent execution in a label can run at a time. Delaying our Seeking state in there would result into blocking all other latent code, making it impossible for the AI to either walk or stay idle for some time. Using timers is still a valid solution to run some latent code like that, so keep that in mind when developing features that do multiple things at once.
Now we need to make use of this Patrolling state. To do that all we need to do is register it inside the boss’ FSM. This can be done through AI controller blueprint we’ve created earlier. Before doing you should subclass the patrolling within BPs, so that you’ll immediately be able to change any property you might want to down the road. However, for now we’ll keep them as they are.
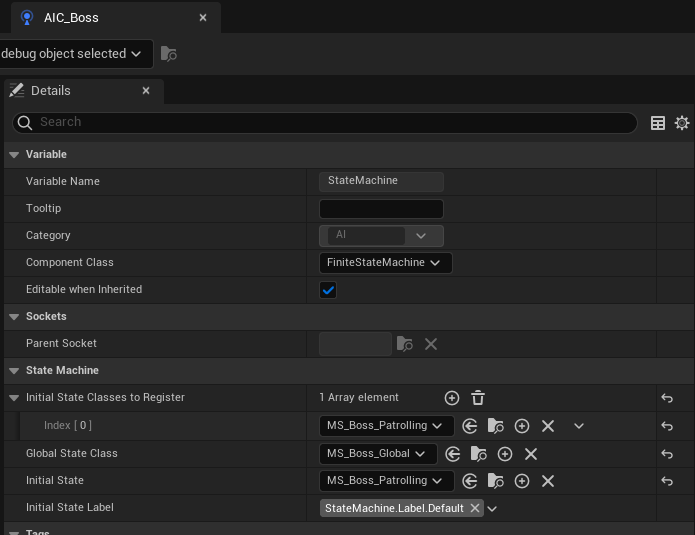
Note that we also change the Initial State since in the design it was defined that the Patrolling state will be
the initial one.
In the project’s repository (commit) you can find the implementation for the actual movement. It won’t be presented in this article as it goes out of our scope.
At this point the boss is capable of moving between different locations endlessly.
Seeking State
The Seeking state closely resembles the Patrolling state, as both involve the boss navigating between predefined move points in an effort to locate a player, subsequently transitioning to the Chasing Player state. However, there are distinctions. In terms of state design, upon its addition to the stack, the boss must enter the Rage Stun state. After the stun concludes, it needs to reactivate the Seeking state, a task easily accomplished through push and pop operations.
UCLASS()
class DEMOUE5FSM_API UDemo_BossState_Seeking
	: public UDemo_BossState
{
	GENERATED_BODY()

protected:
	//~Labels
	virtual TCoroutine<> Label_Default() override;
	//~End of Labels

	AActor* GetMovePoint() const;
};
TCoroutine<> UDemo_BossState_Seeking::Label_Default()
{
	// Push the rage stun; the code after this operation will only take place after we become active
	PUSH_STATE(UDemo_BossState_RageStun);

	while (true)
	{
		AActor* MovePoint = GetMovePoint();

		// Get to a point
		RUN_LATENT_EXECUTION(AI::AIMoveTo, Controller.Get(), MovePoint, -1.f, EAIOptionFlag::Disable);
	}
}

AActor* UDemo_BossState_Seeking::GetMovePoint() const
{
	// The implementation is omitted due to some extra non-AI related complexity; you can find it in the repository
	return nullptr;
}
In the code, it’s evident that there isn’t a significant distinction. Noteworthy, however, is the use PUSH_STATE()
macro inside the default label. It makes the code after that line to be not executed until the completion of the
push operation. This will happen only after the Rage Stun state terminates. This approach eliminates the need for
manually binding any delegate ourselves, as the plugin handles that on our behalf.
Stun States
In the Seeking state we’ve mentioned the Rage Stun state, however it is still not implemented. It going to be pretty straightforward.
/**
 * Base class for a stun state containing minimum logic.
 *
 * There can be different reasons to subclass this class: one might want to add stun counter for a specific stun type
 * for some statistics, or a specific stun type might apply some debuff upon deactivation.
 *
 * In our case, however, we're subclassing it to have different animations based on stun type, and also to allow
 * combining multiple stuns together, as pushing a state that is already present on the stack is prohibited, meaning
 * that the boss cannot be hard stunned while being soft stunned.
 */
UCLASS(Abstract)
class DEMOUE5FSM_API UDemo_BossState_Stun
	: public UDemo_BossState
{
	GENERATED_BODY()

public:
	UDemo_BossState_Stun();

protected:
	//~UDemo_BossState Interface
	virtual void OnActivated(EStateAction StateAction, TSubclassOf<UMachineState> OldState) override;
	virtual void OnDeactivated(EStateAction StateAction, TSubclassOf<UMachineState> NewState) override;
	//~End of UDemo_BossState Interface

	//~Labels
	virtual TCoroutine<> Label_Default() override;
	//~End of Labels

protected:
	UPROPERTY(EditDefaultsOnly, Category="Stun")
	TObjectPtr<UAnimMontage> StunAnimation = nullptr;
};

/**
 * Stun to apply anytime players lowers boss health up to 0 using their flashlights.
 */
UCLASS()
class DEMOUE5FSM_API UDemo_BossState_SoftStun
	: public UDemo_BossState_Stun
{
	GENERATED_BODY()

public:
	// Empty
};

/**
 * Stun to apply anytime players do something to progress, as it hurts the boss a lot.
 */
UCLASS()
class DEMOUE5FSM_API UDemo_BossState_HardStun
	: public UDemo_BossState_Stun
{
	GENERATED_BODY()

public:
	// Empty
};

/**
 * Stun to apply anytime boss transits from Patrolling to Seeking state, as the boss becomes annoyed by the players.
 */
UCLASS()
class DEMOUE5FSM_API UDemo_BossState_RageStun
	: public UDemo_BossState_Stun
{
	GENERATED_BODY()

public:
	// Empty
};
UDemo_BossState_Stun::UDemo_BossState_Stun()
{
	StatesBlocklist.Add(UDemo_BossState_ChasingPlayer::StaticClass());
}

void UDemo_BossState_Stun::OnActivated(EStateAction StateAction, TSubclassOf<UMachineState> OldState)
{
	Super::OnActivated(StateAction, OldState);

	// Disallow attacking the boss while stunned as it's unfair
	GlobalStateData->bIsInvincible = true;

	// Make sure that there's no other action running while we're stunned
	StopLatentExecution();

	// Stopping the latent function doesn't prevent MoveTo to abort the movement, so we have to stop it ourselves
	Controller->StopMovement();
}

void UDemo_BossState_Stun::OnDeactivated(EStateAction StateAction, TSubclassOf<UMachineState> NewState)
{
	GlobalStateData->bIsInvincible = false;

	Super::OnDeactivated(StateAction, NewState);
}

TCoroutine<> UDemo_BossState_Stun::Label_Default()
{
	Character->PlayAnimMontage(StunAnimation);

	// Wait until the stun animation ends
	const UAnimInstance* AnimInstance = Character->GetMesh()->GetAnimInstance();
	while (AnimInstance->Montage_IsPlaying(StunAnimation))
	{
		// Wait until the animation doesn't end
		RUN_LATENT_EXECUTION(Latent::NextTick);
	}

	POP_STATE();
}
Firstly, in the constructor we block the Chasing Player state transition. It means, that while the boss is stunned, it won’t transit to the Chasing Player state. The reason only that state is blocked is due to the nature of its action: it’s the only state that’s activated upon external triggers. Practically it means that it’s activated when the AI sees a player. It’s not something we’ve implemented right now, but it’ll be in the near future.
Secondly, in the Activation and Deactivation methods we simply make the boss immortal and mortal respectively to avoid players trying to stun it while stunned.
Thirdly, in the default label we play the animation, and wait until it’s not playing anymore.
Usually we would’ve listened for some delegates, but using Latent::NextTick allows us to treat only a part of
the label as a Tick function, and check the playing animation montage. When the animation finishes, we
pop ourselves, activating the state that is beneath us in the stack, if any. This allows us to not think about the
reason the Stun state was even activated for.
With the C++ setup out of the way, we need to subclass the three Stun states in the blueprints to assign the animations. The project’s repository you’ll find the animations we’ve been using for the stun (which were taken from Mixamo), however, you can always substitute them with those you prefer.
After creating the blueprints, don’t forget to assign them to the AI controller, otherwise the AI won’t be able to transition to the stun state.
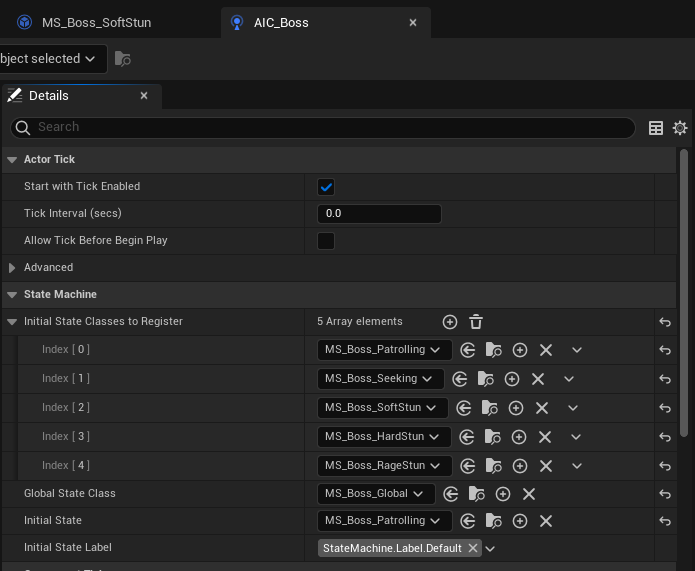
At this point we have a the majority of the AI states. The AI can patrol the area, enter into Seeking state, which starts off the Rage Stun, and then search for players. We also the setup for any stun for future features.
Chasing Player State
This state contains a lot of non-FSM related logic. Firstly, we’ll show all what the state contains, as it’s very simple.
UCLASS()
class DEMOUE5FSM_API UDemo_BossState_ChasingPlayer
	: public UDemo_BossState
{
	GENERATED_BODY()

protected:
	//~UDemo_BossState_Patrolling Interface
	virtual void Tick(float DeltaSeconds) override;
	//~End of UDemo_BossState_Patrolling Interface

private:
	FVector LastTargetPosition = FVector::ZeroVector;
};
void UDemo_BossState_ChasingPlayer::Tick(float DeltaSeconds)
{
	Super::Tick(DeltaSeconds);

	// Don't make a new MoveTo request unless the target position has changed
	if (GlobalStateData->TargetPosition != LastTargetPosition)
	{
		Controller->MoveToLocation(GlobalStateData->TargetPosition, -1.f, false);
		LastTargetPosition = GlobalStateData->TargetPosition;
	}
}
Secondly, we need to explain the reason we call MoveToLocation() that often. One could think if the boss has to
chase a player, we could easily use MoveToActor(), and pass the player character as an argument. The issue with
that approach is that it doesn’t take into account the stimuli.
For instance, the boss can be chasing a player, and at some point the player cuts a corner, after which the boss doesn’t see the player anymore. To keep the AI fair disallowing it see through walls, we could add it the prediction sense: anytime the player leaves our field of view, we ask our sense system to create a stimulus for boss’ prediction sense telling the character that should be predicted. All it does is take the character’s movement direction and speed, and project that using some time. Practically it means that it multiplies the velocity by prediction time in seconds, and adds it to the current position, resulting into a predicted location the player might end up after some time.
There are other examples we can make using hearing or touch senses, but hopefully you got the idea: it’s not possible to use actor as the movement target in certain cases, so to unify the approach we’re using location instead.
We also need to justify the reason of it being called on tick. As you might’ve guessed, when we see a player, we read
the player position every frame, and put it inside the TargetPosition vector. Like that we can always move towards
the newest location.
Making the AI capable of reading the information from its surroundings and respond appropriately is an extensive subject that deserves hours of discussion and thousands of pages of text, which is beyond the scope of this article. Nonetheless, fot those interested in exploring a straightforward implementation we’ve developed, feel free to check out the project’s repository.
However, there’s one interesting detail in the implementation. Anytime the AI receives a stimulus like “player seen” or “player’s position predicted”, the AI tries to push the Chasing Player state to the stack. There’s one issue with doing that. If the player will be seen while the AI is stunned, the Chasing Player state will be pushed on top of the Stun state, making the AI not be stunned anymore.
The issue can be tackled in many ways. The most naive one is to not push the Chasing Player state, but wait until the Stun gets popped. However, that has some other issues as well. If the player will leave the field of view, the AI doesn’t have to enter that state anymore. As a result, we would’ve needed to keep track of that information. Anytime we would add any new entry point to trigger the Chasing Player state would require us to handle that accordingly.
There’s another way UE5FSM offers. To make it easy to handle the transition between the states one can block certain
transitions. Practically it means that the Stun state is going to block the transition to the Chasing Player state.
It doesn’t solve the issue though, as we still need to push that state. This feature can be combined with the query
system for push requests: the FSM comes with PushStateQueued() function that allows you to request to push a state,
but if it fails, the request will be queued, and executed as soon as it’s possible. For this case it means that as
soon as the state (Stun) blocking a certain transition we’re asking to (Stun -> Chasing Player) is not active
anymore, the request will be tried to execute once again. So, once the Stun state finishes, the boss will enter the
Seeking state, which does not block any transition, making our pending push request to the Chasing Player will
immediately succeed, making the AI chase the player.
The code for that looks the following:
UCLASS()
class DEMOUE5FSM_API UDemo_BossState_Global
	: public UDemo_BossState
	, public IGlobalMachineStateInterface
{
	GENERATED_BODY()

	// Old properties and methods...

private:
	void TryToPushChasingPlayerState();

private:
	FFSM_PushRequestHandle PushRequestHandle;
};
void UDemo_BossState_Global::TryToPushChasingPlayerState()
{
	if (!StateMachine->IsInState(UDemo_BossState_ChasingPlayer::StaticClass(), true) && !PushRequestHandle.IsPending())
	{
		StateMachine->PushStateQueued(UDemo_BossState_ChasingPlayer::StaticClass(), TAG_StateMachine_Label_Default, &PushRequestHandle);
	}
}
UDemo_BossState_Stun::UDemo_BossState_Stun()
{
	StatesBlocklist.Add(UDemo_BossState_ChasingPlayer::StaticClass());
}
Anytime it’s required to transit to the Chasing Player, we’ll use the
UDemo_BossState_Global::TryToPushChasingPlayerState(), which checks whether it’s already active, AND whether
there’s no pending request we might’ve done already, and if both the conditions are true, we make that request. If
the Stun state is active, the request will succeed only after the Stun state deactivation. However, if it isn’t,
the request will be immediately executed, pushing the state on top oc the stack.
Carrying Player State
Like Chasing Player state, this one contains a lot of non-FSM related logic. It’s required to detect when the player has to be grabbed, which involves adding new collision component to the boss character, and also handle its activation state. In fact, the component should be disabled when the boss is not chasing a player. This state also involves handling the player meanwhile it’s carried. There are more caveats to manage, but we’ll be describing what involves the FSM.
UCLASS()
class DEMOUE5FSM_API UDemo_BossState_CarryingPlayer
	: public UDemo_BossState
{
	GENERATED_BODY()

public:
	UDemo_BossState_CarryingPlayer();

protected:
	//~UDemo_BossState Interface
	virtual void OnActivated(EStateAction StateAction, TSubclassOf<UMachineState> OldState) override;
	//~End of UDemo_BossState Interface

	//~Labels
	virtual TCoroutine<> Label_Default() override;
	//~End of Labels

	AActor* GetMovePoint() const;
};
UDemo_BossState_CarryingPlayer::UDemo_BossState_CarryingPlayer()
{
	StatesBlocklist.Add(UDemo_BossState_ChasingPlayer::StaticClass());
}

void UDemo_BossState_CarryingPlayer::OnActivated(EStateAction StateAction, TSubclassOf<UMachineState> OldState)
{
	Super::OnActivated(StateAction, OldState);

	// Make sure that there's no running MoveTo
	Controller->StopMovement();
}

TCoroutine<> UDemo_BossState_CarryingPlayer::Label_Default()
{
	AActor* MovePoint = GetMovePoint();
	RUN_LATENT_EXECUTION(AI::AIMoveTo, Controller.Get(), MovePoint);

	// Kill player
	// ...

	// Restart AI
	ClearStack();
	PushState(UDemo_BossState_Patrolling::StaticClass());
}

AActor* UDemo_BossState_CarryingPlayer::GetMovePoint() const
{
	// The implementation is omitted due to some extra non-AI related complexity; you can find it in the repository
	return nullptr;
}
Firstly, we block the transition to the Chasing Player state. The only reason to do that is because anytime the boss grabs a player, it goes to the Carrying Player, as opposed to the pushing. That means that it might transit to Chasing Player while carrying one, which is not what we want, as the boss has to kill the carried player.
Secondly, in the OnActivated(), we do a preliminary step to ensure that the AI not moving. A possible issue might be
that the AI controller would queue the MoveTo requests; since we’re transiting from Chasing Player, which includes
MoveTo, to Carrying Player, we might have a MoveTo running.
Thirdly, in the Label_Default(), the boss moves to some move point, and upon reaching that we do something to
kill the player. It’s up to you what exactly it’ll be. After killing it, the boss AI gets restarted by clearing the
states stack, and pushing the Patrolling state on top of that.
After the Carrying Player state finishes its execution, we’re left with a clean AI that is patrolling once again.
Improving Stuns
So far we’ve made a working AI for a single player game. However, since the game is intended to be multiplayer, the AI might be stunned by other players progressing the game, or by simple flashlight. Again, how exactly you’re going to do that depends on your game. Instead, we’re going to present what to do when it takes place.
To showcase how the AI is going to be stunned by progressing the game or flashlight, and keep the flow, i.e. it won’t
break if the AI gets stunned at any point, we’re going to make a simple UFUNCTION that is callable from the console.
The functions will be placed under the ADemo_BossController like this:
UCLASS()
class DEMOUE5FSM_API ADemo_BossController
	: public AAIController
{
	// Old things...

protected:
	UFUNCTION()
	void OnProgression();

	UFUNCTION()
	void OnFlashlight();
};
void ADemo_BossController::OnProgression()
{
	StateMachine->PushState(UDemo_BossState_HardStun::StaticClass());
}

void ADemo_BossController::OnFlashlight()
{
	if (!GlobalStateData->bIsInvincible)
	{
		StateMachine->PushState(UDemo_BossState_SoftStun::StaticClass());
	}
}
Anytime the game progresses we Hard Stun the boss. However, as for the flashlight, it doesn’t always work. In fact, the boss doesn’t have to be invisible to be Soft Stunned, which is not the case only during Patrol and any other stun state.
To run any UFUNCTION() you can run a simple command in the console (` key) while playing, which will run that
function on every actor that has one with that name. Substitute the function name with the one you’re interested in,
in our case it’s OnProgression or OnFlashlight. Note that the command is case insensitive.
ke * MY_FUNCTION_NAME
Pushing the stuns like that is not going to work perfectly. In fact, stunning the boss will result it into staying still, and allowing the player to escape, but that shouldn’t be it. In fact, in the design we’ve defined earlier we said that the boss has to reset its AI, i.e. clear all the states, and start patrolling once again.
To easily reset a state after a stun we have to modify the UDemo_BossState a little bit. We need to allow
child states to define whether they want to restart after a stun or not. In fact, seeking state wants to restart
upon that, but only if it’s not Rage stun since it’s type of stun the boss enters in upon starting to seek. While
the boss is either chasing or carrying a player, it should restart the AI upon being stunned as well.
class DEMOUE5FSM_API UDemo_BossState
	: public UMachineState
{
	// Other things...

protected:
	virtual void OnActivated(EStateAction StateAction, TSubclassOf<UMachineState> OldState) override;

	void RestartAI();

	UPROPERTY(EditDefaultsOnly, Category="Stun")
	bool bStunRestartsAI = false;

	UPROPERTY(EditDefaultsOnly, Category="Stun")
	TArray<TSubclassOf<class UDemo_BossState_Stun>> StunBlocklist;
};
void UDemo_BossState::OnActivated(EStateAction StateAction, TSubclassOf<UMachineState> OldState)
{
	Super::OnActivated(StateAction, OldState);

	if (bStunRestartsAI && IsValid(OldState))
	{
		// Filter out stun classes that we don't want to be restarted by
		if (StunBlocklist.ContainsByPredicate([OldState] (TSubclassOf<UDemo_BossState_Stun>)
			{
				return OldState->IsChildOf(UDemo_BossState_Stun::StaticClass());
			}))
		{
			return;
		}

		if (OldState->IsChildOf(UDemo_BossState_Stun::StaticClass()))
		{
			// Don't run any label as we're about to reset the AI
			GotoLabel(FGameplayTag::EmptyTag);

			// Restart the AI upon being stunned
			GetTimerManager().SetTimerForNextTick(FTimerDelegate::CreateWeakLambda(this, [this] { RestartAI(); }));
		}
	}
}

void UDemo_BossState::RestartAI()
{
	// Make sure that there's no other action running while we're stunned
	StopLatentExecution();

	// Stopping the latent function doesn't prevent MoveTo to abort the movement, so we have to stop it ourselves
	Controller->StopMovement();

	// Release a possibly carried player
	// ...

	// Remove any current state
	ClearStack();

	// Start off by patrolling
	GotoState(UDemo_BossState_Patrolling::StaticClass());
}
It’s pretty straightforward. Anytime a state is activated, it checks whether it wants to be reset by a stun, and if
the previous state it was in was in fact a stun, then we check whether this stun class is ignored, and if so, the
boss restart the AI the next tick. The only reason to do that after a tick is because the RestartAI() contains the
ClearStack() function which cannot be run inside a machine event. We also disable the label activation by going to
EmptyTag label so that the state doesn’t run any code.
At this point we need to make so that certain states restart themselves upon stun. To do that we’re going to modify their blueprint versions. Firstly, the Seeking state, if the boss is stunned while seeking, it should restart the AI, but only if it’s not a Rage stun.
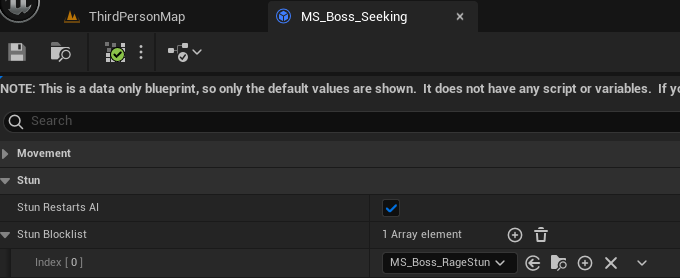
Secondly, the Chasing Player and Carrying Player states, they should restart the AI regardless the stun type. All
you have to do is to enable the bStunRestartsAI in appropriate blueprints.
Debug
So far you’ve been lead through everything. However, as soon as you start getting your hands on the plugin yourself, you might do something that doesn’t work the way you expect. You can always rely on print strings, however, it’s not always possible to do. In fact, you might have a lot of AI characters, and you wouldn’t be able to easily track the state of each one of them using the mentioned method.
The plugin comes with a custom Gameplay Debugger category you’re able to customize on the fly with your own machine
states. It’s done by using FString UMachineState::GetDebugData(): if it returns a non-empty string, the value will
be displayed in the mentioned category. We’ve made a few features that will serve us perfectly.
As you might remember, we’ve made a Patrolling state. The state includes two simple things: move to an actor, and stay idle for some time. This information can be displayed dynamically in the UE5FSM Gameplay Debugger category. However, we would need to modify the default label a little bit:
class DEMOUE5FSM_API UDemo_BossState_Patrolling
	: public UDemo_BossState
{
	// Other things...

private:
	TWeakObjectPtr<AActor> MovePoint = nullptr;
	float WaitTime = 0.f;
	float WaitStartTime = 0.f;
};

TCoroutine<> UDemo_BossState_Patrolling::Label_Default()
{
	while (true)
	{
		// Get to a patrol point
		MovePoint = GetMovePoint();
		RUN_LATENT_EXECUTION(AI::AIMoveTo, Controller.Get(), MovePoint.Get(), -1.f, EAIOptionFlag::Disable);
		MovePoint.Reset();

		// Stay idle for a while
		WaitStartTime = GetTime();
		WaitTime = FMath::FRandRange(MinWaitTimeUponMove, MaxWaitTimeUponMove);
		RUN_LATENT_EXECUTION(Latent::Seconds, WaitTime);
	}
}
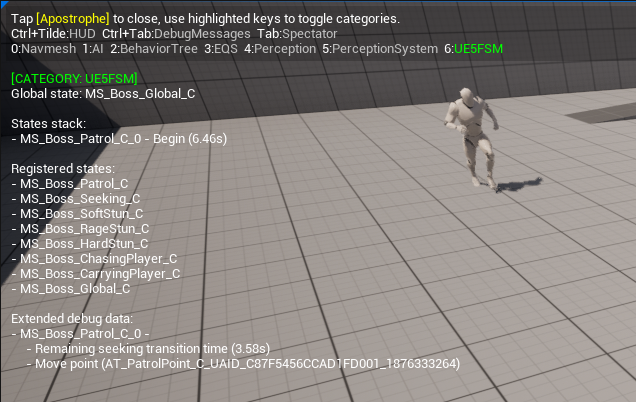
The functionality didn’t change, however, now we have reference to data that is used in a certain moment. These are going to be used to form a string in the mentioned method.
FString UDemo_BossState_Patrolling::GetDebugData() const
{
	FString ReturnValue;

	const float RemainingSeekingTransitionTime = GetTimerManager().GetTimerRemaining(SeekingTransitionTimer);
	if (RemainingSeekingTransitionTime > 0.f)
	{
		ReturnValue.Appendf(TEXT("\t- Remaining seeking transition time (%.2fs)\n"), RemainingSeekingTransitionTime);
	}

	if (MovePoint.IsValid())
	{
		ReturnValue.Appendf(TEXT("\t- Move point (%s)\n"), *MovePoint->GetName());
	}

	const float RemainingWaitTime = WaitTime - TimeSince(WaitStartTime);
	if (RemainingWaitTime > 0.f)
	{
		ReturnValue.Appendf(TEXT("\t- Remaining wait time (%.2fs)\n"), RemainingWaitTime);
	}

	if (!ReturnValue.IsEmpty())
	{
		ReturnValue = FString::Printf(TEXT("\n%s"), *ReturnValue);
	}

	return ReturnValue;
}

void UDemo_BossState_Patrolling::OnDeactivated(EStateAction StateAction, TSubclassOf<UMachineState> NewState)
{
	// Clear the data in case we transition to another state
	MovePoint.Reset();
	WaitTime = WaitStartTime = 0.f;

	// Old code...
}
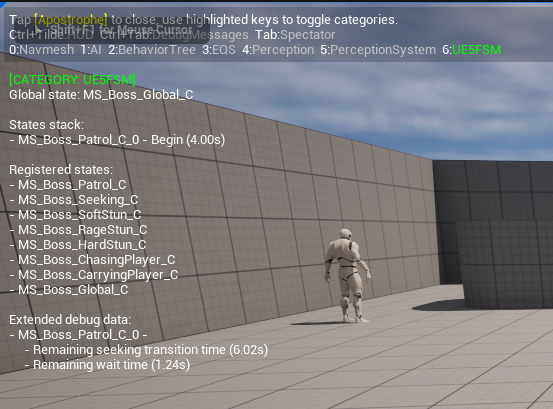
The method displays a bunch of data depending on its relevancy. Firstly, we should the seeking transition timer if it’s still running. Secondly, we should a move point if there’s one (not that we clear it anytime we don’t move towards it). Thirdly, we show the wait time remaining time if it’s valid. Fourthly, just for formatting reasons, we add a newline if there’s any information that the state is currently showing. This results into a neat way of debugging your own machine states.
Closing Thoughts
This article covers a lot of UE5FSM functionality one should be familiar with when using the plugin. From what you’ve seen the tool gives a versatile and structured way of creating AI. Using Behavior Tree would be easier and faster to achieve the same goals up to some point, but introducing the stuns would create hard time managing the behavior. We personally find it extremely convenient to make use of the plugin when making mid complexity behaviors for all the benefits it offers.
Hopefully you give UE5FSM a try on your own, or even use it inside your own project! If you do, please share your experience with me (Discord: Tonetfal) as I would love to hear back from you!
Visit the plugin’s Github page to learn more about it.